
Nexus of Eternity LM - WRDL Strategy
Written by Naro
This is a guide for Nexus of Eternity LM, check out the builds for Nexus of Eternity LM here.
Our WRDL walkthrough for Vloxx in Legendary Challenge Mode.
This is an example of a composition. Renegade is great for Lifeforce Battery. Having 2 players geared for single target and relegating utility responsibilities will help with the boss timer.
Subgroup1 | Subgroup 2 |
|---|---|
Greedy DPS (Harbinger / Renegade / Weaver) Tanky DPS (Scourge) Tanky DPS (Scourge) |
Greedy DPS (Harbinger / Renegade / Weaver) Tanky DPS (Scourge) Tanky DPS (Scourge) |


Before the pull
Before starting, assign:
- Shot Caller: The person who is guiding the group with movement and positioning. They will tell the group where to stack, which direction to move, and keep the group aware of upcoming mechanics. If you need to dodge through lines in P2, they'll bark which direction. If they want you to stack on top of them for Fixate baiting, they'll call it out. This is best done on a healer.
- Green groups: Melee, Ranged, and Healers with fixate. Understand what you are, this is not necessarily divided in to subgroups. See Green Strategy below.
- Floater: Joins the healer group if a healer is fixated; otherwise defaults to melee.
- Staff baiter: This is for consistency on staff positioning. If the group leaves earlier for Spreads, this role is redundant. We let our 'non-fixate' Healer do this (This is only for the beginning of the fight
- Projectile defence: Assign P2 Projectile Block/Reflect order. This is generally covered by 3x
 Corrosive Poison Cloud,
 Feedback, or
 Smoke Screen. Anything that can cover ~15 seconds of projectile block with overlap. Also assign who is calling out the rotation, it could be the shot caller calling this as well.
- P4 route: In our strategy, we start south and move clockwise. We get our first Geometry attack in the west position.
- Collector: Player who is going to be collecting orbs during critical moments, otherwise the responsibility of the entire group. This is better suited to be one of the healers, the one who isn't the shot caller.
Shared mechanics
Green strategy
Judgment of Eternity
Each large green needs at least three valid soakers, including the marked player. Stand in one circle only; a player inside overlapping circles counts for neither, but will still be punished by the green(s) that fail. Because of the timer, failing any green earlier in the fight is a wipe.
Green selection is heavily influenced by close proximity, so melee players stand closest to Vloxx to get 2 of the Greens. Healers and ranged players stay farther back. Follow the actual markers if selection differs.
If both non-fixate greens land on melee players, both start toward the ranged position. The player ahead continues; the trailing player stops at melee. If a ranged player already has a green, they take the ranged position and the melee green stays melee.
Call shortages immediately and send the spare player to the circle that needs a third. If the floater is fixated, they join the healers; check whether melee needs a replacement after a marked player moves to ranged.
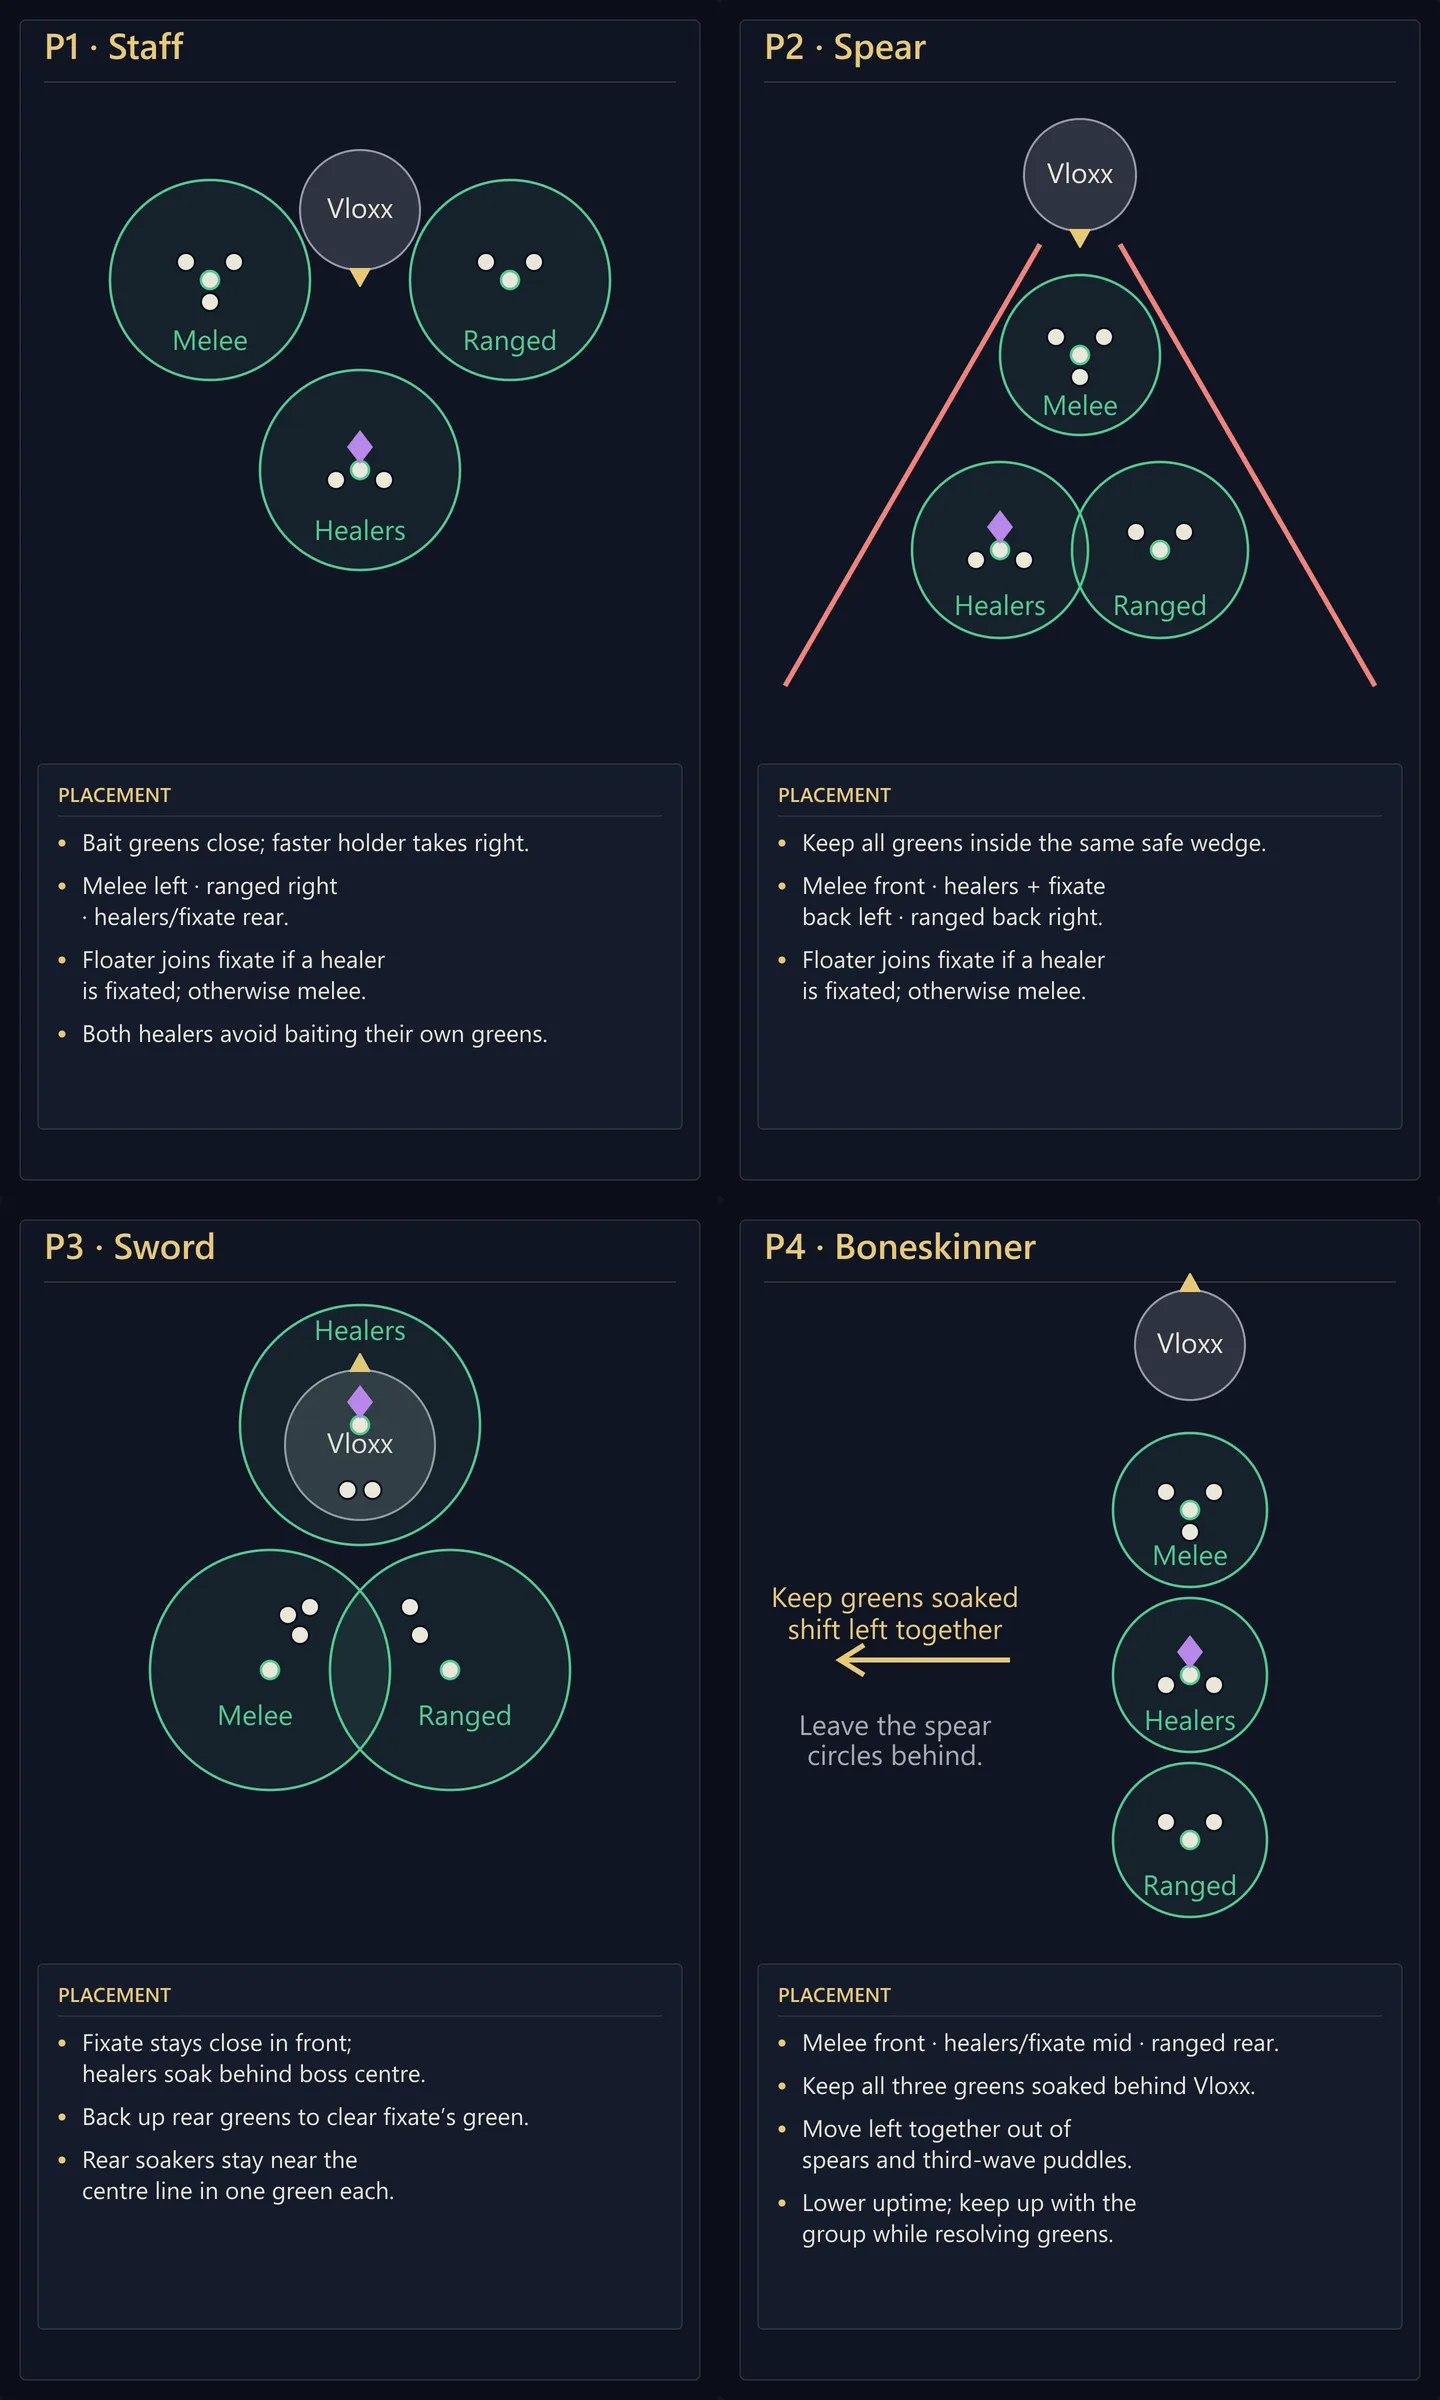
Standard LCM green formations. P3 opens with the formation we use in P1, P4 opens with the P2 triangle before switching to Boneskinner.
Champions at Intermissions
Balance add health by switching targets early. Move damage off the lower-health add before it dies and bring the others down together. Apply this in all three intermissions: unlike CM, where two adds are elites and die very quickly, LCM requires efficient add cleave and management.
Ascension, Orbs, and Collection
Personal Ascension starts at ten. Failed large greens cost three stacks; failed P1 Tether and P3 teleport corruption cost one, getting hit by lines cost one. Reaching zero is fatal. Lost stacks strengthen Vloxx, and death can transfer a player’s remaining stacks.
An orb restores one missing personal stack, up to ten, and removes one Empowered stack from Vloxx. Prioritise players missing Ascension when collection is safe.
Weapons will not spawn orbs if Vloxx has no Empowered, keep track of this. It sometimes is in the best interest of the group to keep a single Empowered stack on Vloxx in earlier phases (P1/P2). With good positioning and cleave, you can keep Empowered very low.
Mechanic names
Call | Official name |
|---|---|
Greens | Judgment of Eternity |
Puddles | Probability Distribution |
Orb | Annihilating Orb |
Stars | Surrounding Curse |
Star volley | Eternal Reflection |
Tether | Ascension’s Sacrifice |
Charge | Cosmic Charge |
Lines | Worldpiercer |
Spears | Raging Storm |
Stabs | Thousand Strikes |
Reds | Echoing Blade |
Teleport | Slice Through Reality |
Geometry | Excision Extremis |
Division | Division Eternal |
Champion at Intermissions
Balance add health by switching targets early. Move damage off the lower-health add before it dies and bring the others down together. Apply this in all three intermissions: unlike CM, where two adds are elites and die very quickly, LCM requires efficient add cleave.
P1 Staff
100–70% health
Arena entry and the first Orb
One player enters the arena to trigger the encounter, then immediately backs out toward the waiting squad. The other nine stay outside at maximum range; nobody follows the pull player in. This setup gives us one marked green in the opening round.
Being put into combat is not the cue to enter. Wait for the encounter to teleport the squad into the centre.
Place projectile destruction on the group around six seconds after that teleport, so protection is active before Stars (Surrounding Curse) arrives and decimates the group. Clear any remaining circles while preparing the first Orb bait.
Fixate aims the first Orb directly north of arena centre. Clear the arrow, let the orb pass, then follow Vloxx north and jump or evade the shockwave at his destination.
It should be noted that providing stability and aegis for when Vloxx casts Annihilating Orb is a massive boon to the group. It's hitbox range is deceptively large.
Bring the Staff through Vloxx
Staff spawns north-northwest of centre, southwest of Vloxx’s first northward destination. The baiter stands beyond Vloxx to the northeast so the Staff’s approach brings it through the boss and into cleave. Weapons in this encounter will rotate between certain attacks, but one of them will target a player in maximum range. This is especially tricky with the staff since it does not naturally want to move into the group given the range of it's attacks.
Baiter: keep Staff → Vloxx → baiter aligned.
Rest of the squad: leave nobody or their summons beside the Staff.
While it approaches: let its current cast finish and keep  Immobile off.
Once it arrives: the baiter rejoins and we cleave both targets. Stop extending the bait once Staff is in position.
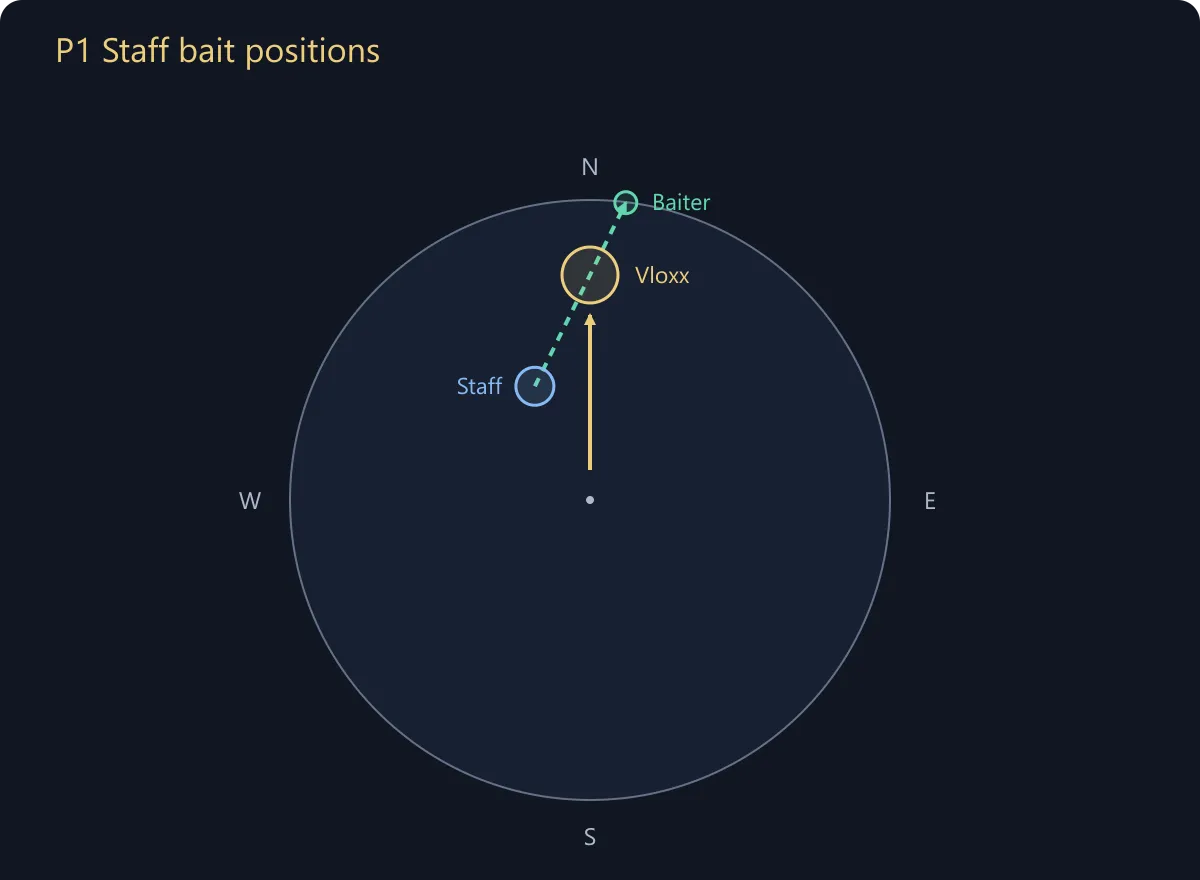
Staff spawns north-northwest of centre, southwest of Vloxx’s first northward destination. Keep Staff → Vloxx → baiter aligned; the baiter’s distance is illustrative.
If Staff stays at range, check for a nearby player or summon, an unfinished cast, or Immobile before moving farther away. Immobilize can delay a new approach even when an approach already underway continues.
Fixate baits for the remaining Orbs
After the first northward bait, fixate sets the remaining Orb directions:
- Second Orb: directly into the wall.
- Third Orb: toward Staff spawn, where we expect Staff to have been cleaved down and can handle its return.
- Fourth Orb: toward Spear spawn, setting up our first-intermission position.
Clear each Orb’s path, follow after it passes, and jump or evade the arrival shockwave. Regroup at the new boss position so we keep the weapons accessible to cleave.
Place puddles together, wait for the warnings to lock, then leave before activation. Keep the next stack and Orb route clear. Avoid Star volley (Eternal Reflection); keep projectile blocks and reflects out of that volley because they can cause dangerous explosions.
For Tether, each marked player gets a partner. Keep the circles separate and wait for all three selections before the assigned group stun break, then reform.
At 70 percent, group on Spear for the first intermission. If a champion is already on top of Spear, call it as the priority target.
Intermission 1
We group on Spear and begin damage there. The first adds are Cosmic Piercers, which generally teleport toward us and come into cleave.
Our first target call is:
- Spear stack clear of champions: start on Spear and cleave the adds as they teleport in.
- Champion on top of Spear: prioritise that champion together and cleave Spear where possible.
The call follows what has actually spawned at our stack.
Finish the required adds, then break Vloxx’s defiance bar.
P2 Spear
70–40% health
After the first intermission and Vloxx’s first defiance-bar break, we set up to bait Vloxx toward Staff spawn, north-northwest of arena centre. We bring the boss to the weapon so we can cleave the Staff alongside Vloxx, then establish a safe wedge around that stack.
Usual opening sequence: Greens → Charge → Lines → Spears.
Opening Greens and Charge
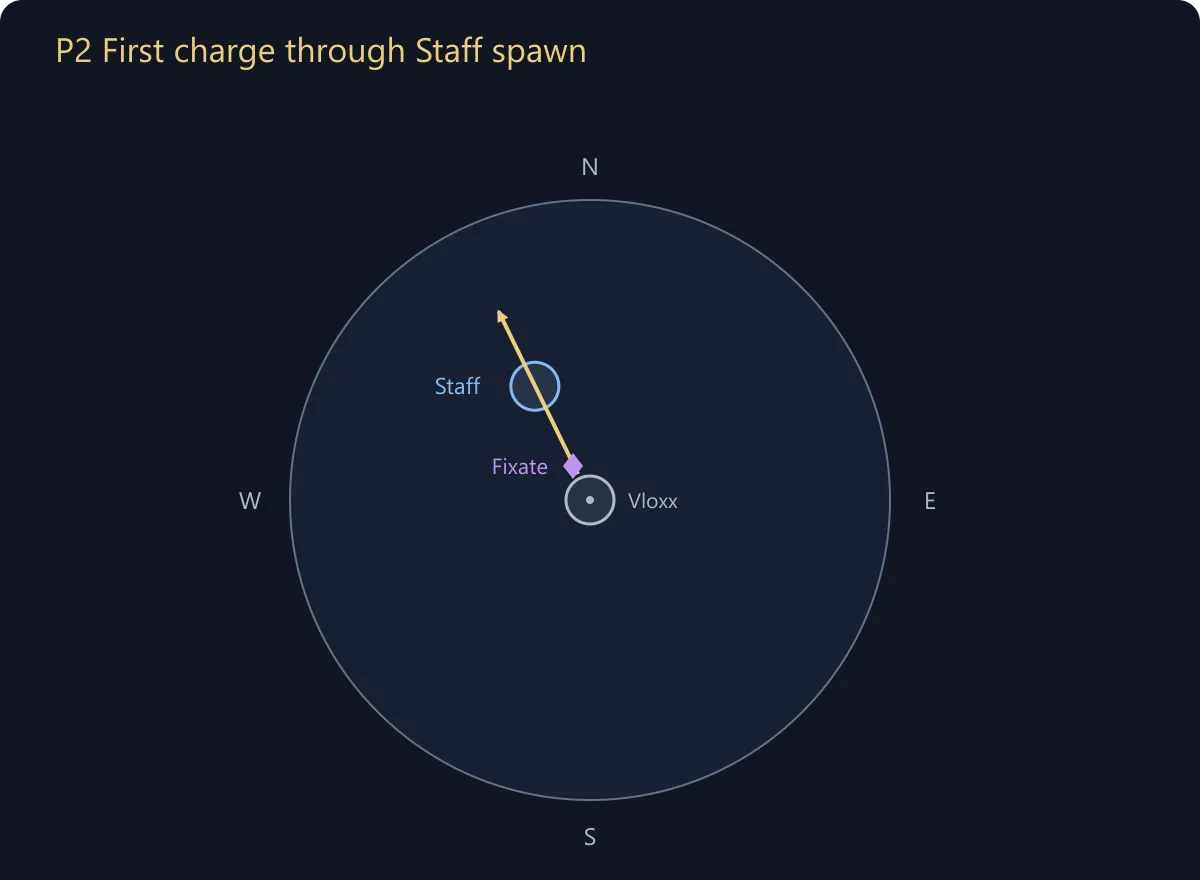
- Fixate: Start close to Vloxx’s starting position, on the side facing Staff spawn, to aim the charge through it. Be ready immediately—Charge can be his first attack.
- Opening greens: Use the P1 triangle in the combined green strategy. Fixate holds the charge-bait position as greens resolve; Vloxx will typically charge during Greens as they are resolving.
- Group protection: Provide
 Stability and
 Aegis to prevent knockback or boon strips when the charge passes through the group.
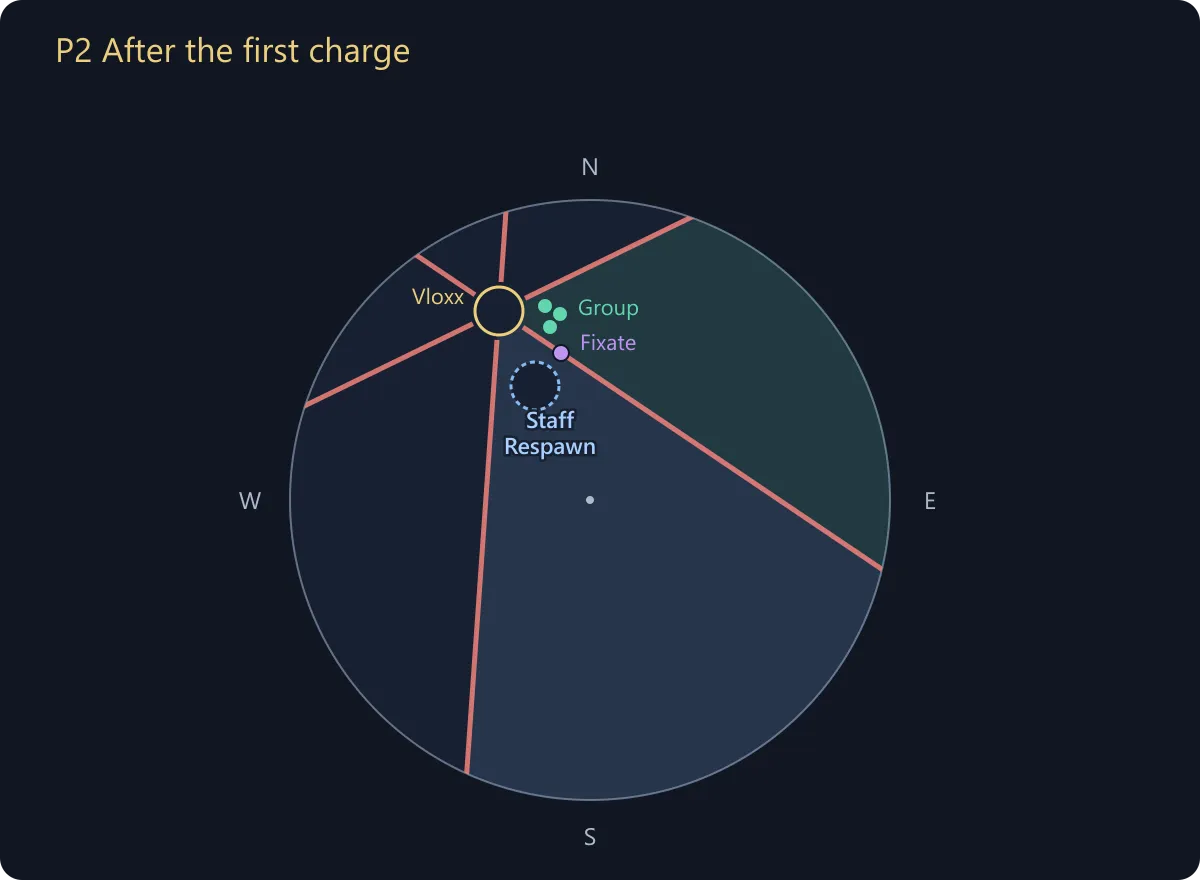
Players can chase the boss to the new location freely, and the Fixate player should try to bait the Lines such that a wedge is open to attack the Staff when it respawns.
For the second charge, aim toward Spear spawn. Spear should have died early in P2 and is expected to respawn around that charge. Bring it into cleave as it returns.
For subsequent charges, keep Vloxx’s movement localised around the centre, adjusting the bait to prioritise cleaving Champion Weapons. Follow the actual deaths and respawns when choosing the direction. The shot caller will be dictating movements and positioning but it's always a good idea if you're the Fixate player to understand where you want the boss to travel.
Spear coverage
For Raging Storm, we stay stacked so the fields cover the incoming impacts:
- Group stays stacked to keep spear impact inside our projectile block fields.
- Perform Feedback and Corrosive Poison Cloud in the assigned order.
- Call the next field before the current coverage expires.
The entirety of Raging Storm can easily be covered by 3x Corrosive Poison Cloud with moderate overlap. If you have brought Feedback, it can be used as an emergency backup.
Intermission 2
Prioritise Cosmic Bulwarks. They summon orbs that knock players down. Cosmic Piercers, the same adds from the first intermission, should come toward the group naturally.
Switch targets early to balance add health, finish the required adds, then break Vloxx’s defiance bar.
P3 Sword
40–10% health
Coming out of the second intermission, we establish fixate in front and the squad behind.
Throughout P3, watch fixate and adjust to Vloxx’s current angle. After fixate moves or changes, reassess where the boss is facing and reposition behind that facing. Our formations are relative to Vloxx, not fixed compass directions; the old safe side may no longer be safe after he turns.
Usual opening sequence: Greens → Reds → Teleport → Geometry. Follow the actual casts if the order changes.
Opening greens
We form the P3 greens around Vloxx:
- Fixate: just in front, near the hitbox centre.
- Both healers: inside fixate’s green, behind the boss centre.
- Rear green holders: back up enough to clear fixate’s circle.
- Rear soakers: stay near the centre line behind Vloxx, inside one green each.
We check the floater’s position before resolution. If a healer is fixated, the floater joins that green. Otherwise they remain with melee. We keep the boss facing our bait position through the late slashes rather than turning him as soon as the green resolves. After the Greens resolve, converge on to the boss before Teleport occurs and use Stability before you get teleported. Without Stability you will need to be stun broken through something like  Tale of the Valiant Marshal or
 Stalwart Stance.
Teleport and Fixate
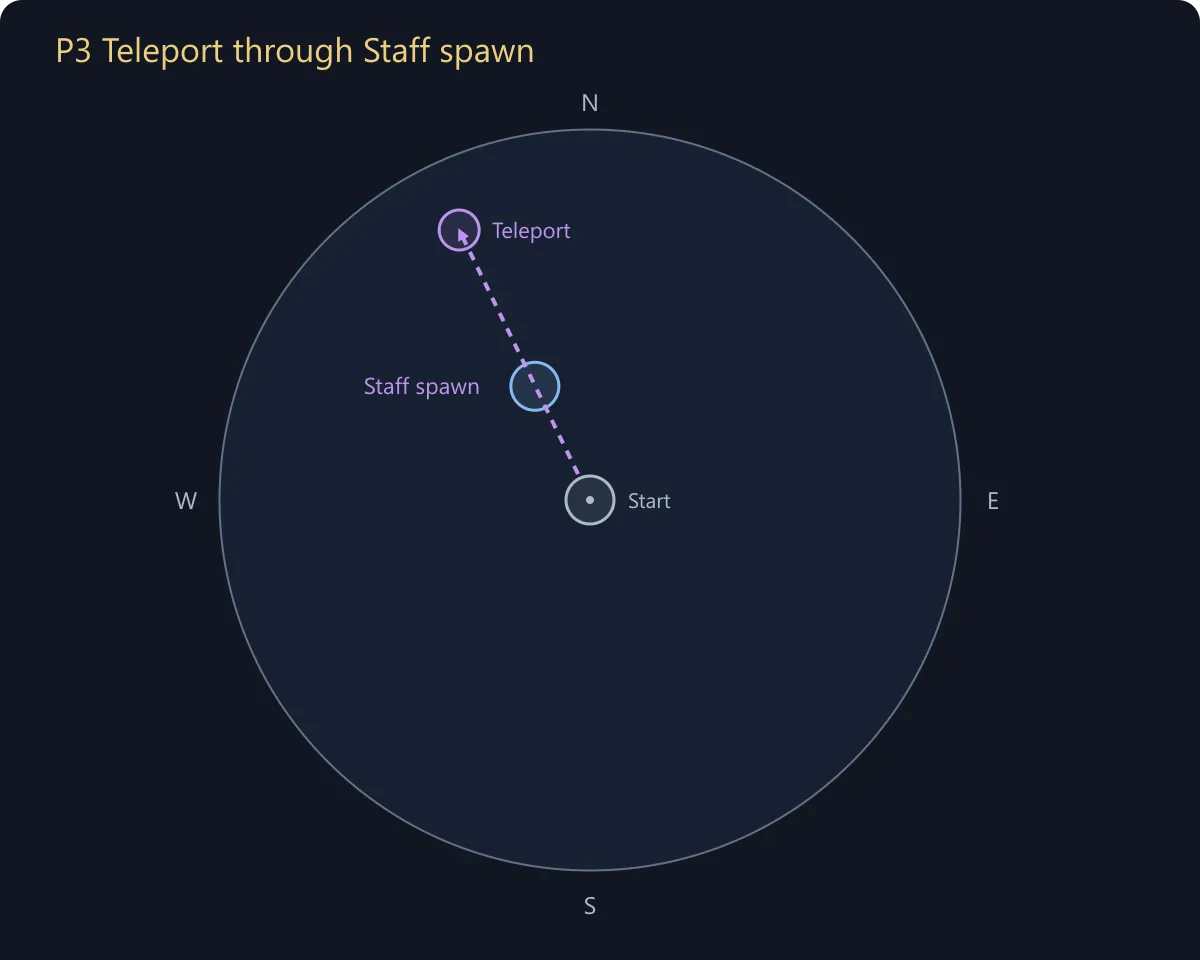
We start P3 in the centre. For Slice Through Reality, we bait the teleport along the Staff spawn line, north-northwest. Vloxx travels approximately 2,000 units, continuing beyond Staff spawn. After Teleport, Fixate needs to be close to Vloxx, facing Vloxx to the wall. The rest of the group can stack tightly behind him.
Reds
Echoing Blade
Reds always start from the direction the boss is facing. If the Fixate target has a keen eye, they can see the wind up attack before the Telegraph occurs and CAN avoid 100% of the damage with well placed dodges. Similarly the rest of the group has a very easy time to avoid damage by getting in front of the counterclockwise pattern, and Dodging through the Red circles as they travel towards the Fixate location.
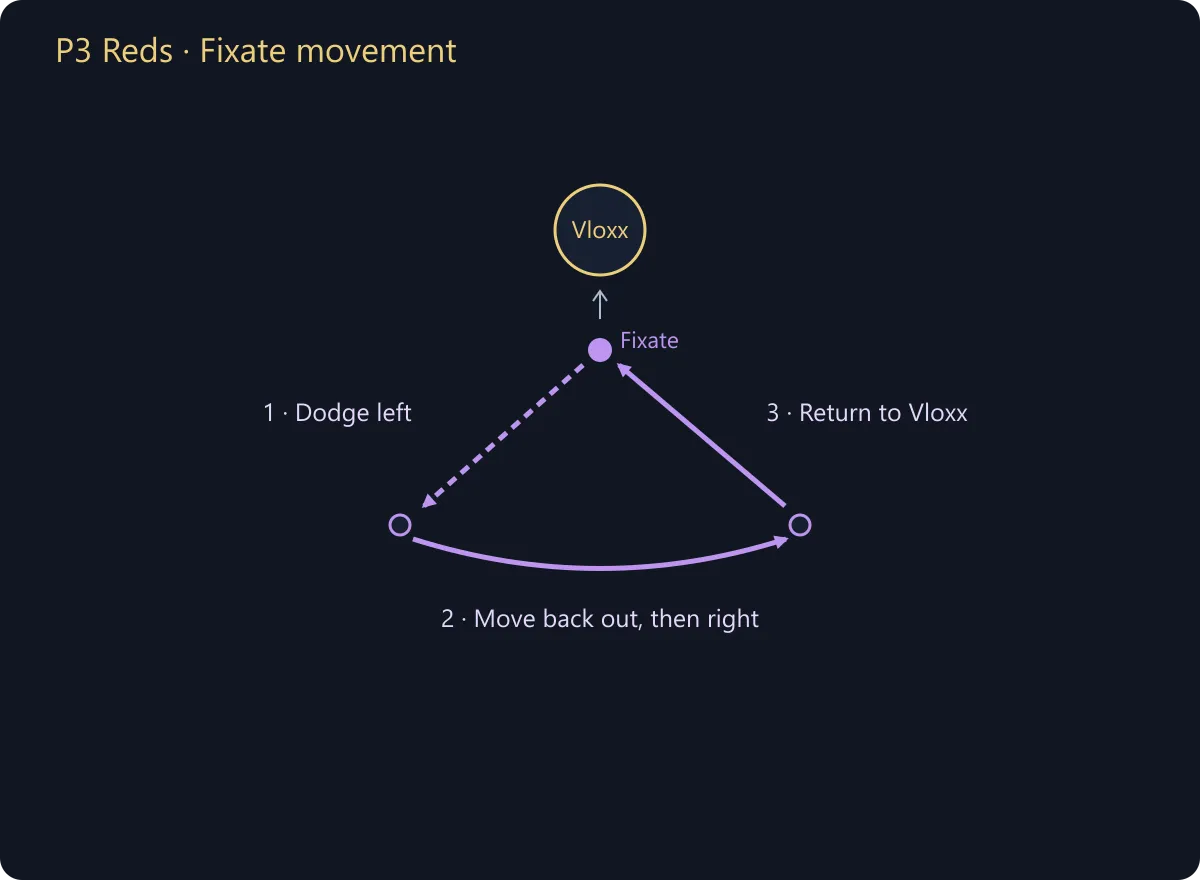
Fixate can use this movement sequence, with left and right taken while facing Vloxx:
- Dodge left immediately as the attack starts.
- Move back out to create space.
- Move toward the right, watching the travelling swords as well as the sweep.
- Return to position on the boss, restoring the front position for the next mechanic.
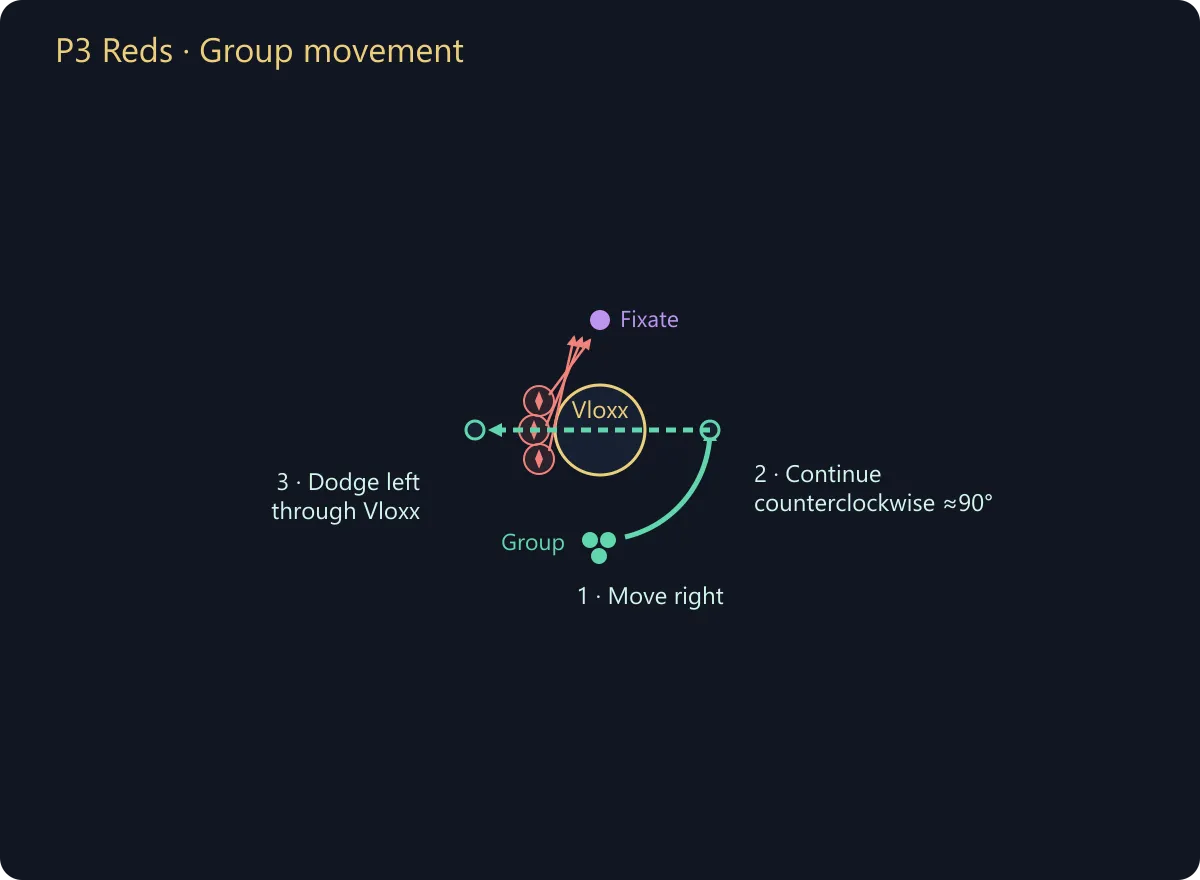
The group can use this movement sequence, with left and right taken while facing Vloxx:
- Move right, staying ahead of the telegraphs.
- Continue counterclockwise around Vloxx for roughly 90 degrees.
- Dodge left across the red blade circles.
- Watch Fixate as Vloxx finishes attacking and turns to face them, then regroup behind the boss.
We watch the travelling red swords separately from the sweep. In LCM, we avoid those swords with movement and evades; the projectile fields used in P2 do not provide our protection here. We keep watching reds after the sweep finishes, then restore the stack and facing for the next cast.
Geometry
Excision Extremis
Geometry is based on selected players’ positions and Vloxx’s facing. Each selected player produces a set of four half-moons. Their centres are offset around that player’s sampled position, using the line between the player and Vloxx; successive placements turn through quarter-turns. The direction each half-moon covers follows Vloxx’s facing, so the pattern depends on both where the target stood and which way the boss faces.
The shapes are placed around players rather than simply centred on the boss. Other players’ patterns can therefore reach us even when we are behind Vloxx. A turn can also change the orientation of later slashes, so we keep watching fixate and adjust to the new angle.
We keep the stack compact and minimise unnecessary movement while positions are sampled. During greens, the holders create room while their soakers stay toward the centre line, inside one green each. Hold the intended facing through the late slashes before regrouping.
Solving Greens with Geometry
Keep the same three green groups while positioning for Excision. The green holders create the space; the soakers stay toward the central gap.
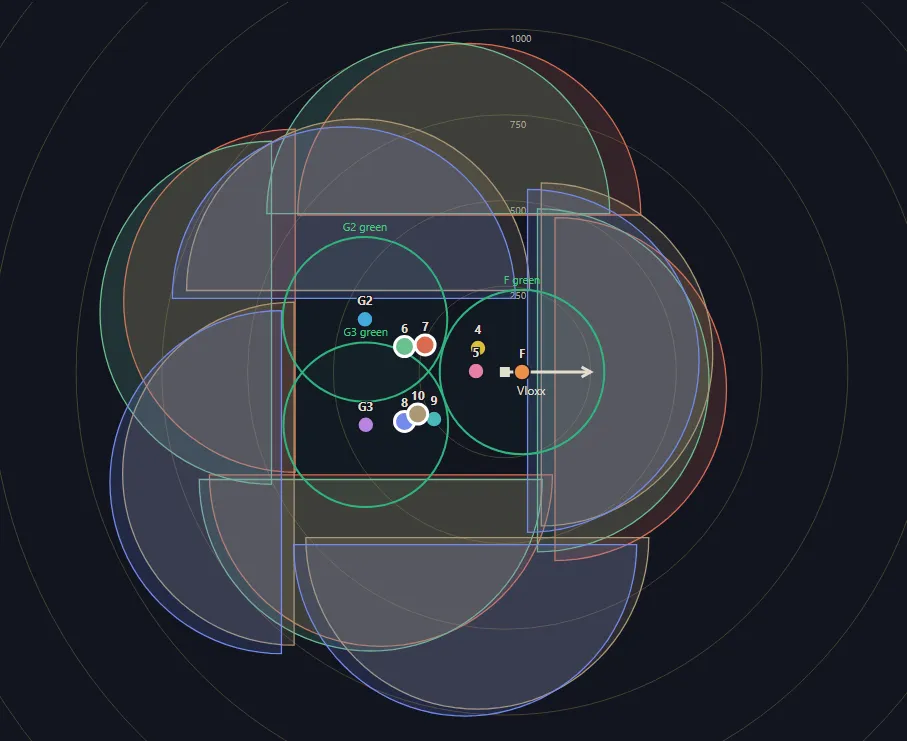
P3 greens with Excision. Vloxx faces right in this view; the formation is rotated from the diagram above. F is fixate, and G2 and G3 are the rear green holders.
- Fixate and healers: Fixate holds just in front of Vloxx; both healers soak from behind the boss centre, inside fixate’s green.
- Rear green holders: G2 and G3 sit back and to either side, clearing fixate’s circle and keeping the rear greens distinct.
- Rear soakers: Stand toward the inside edge of their assigned green, in the central gap between the half-moon footprints. Stay out of green overlaps so every player counts for one circle only.
This formation spreads the marked greens while keeping their soakers close to the centre line, reducing exposure to other players’ Excision patterns. Maintain at least three valid soakers per green and keep Vloxx’s facing steady through the late slashes before regrouping.
Fixate Recovery
If fixate changes or goes down, the new fixate moves to the opposite side of Vloxx to establish the front. The group adjusts behind that facing, then resumes the next green or movement sequence. We continue this cycle until 10 percent and enter the final intermission together. Mechanics such as Division need to be dodged BEFORE the telegraph occurs. Geometry attacks with no Fixate target tend to be aimed directly at the group, just dodge through the boss or away from the telegraph spaghetti. Adjust to minimize damage until a new fixate target has been chosen.
Intermission 3
Prioritise Cosmic Sunderers, the new champion type in this split. Cosmic Bulwarks and Cosmic Piercers should come toward the group.
Balance health across the add types by switching early, finish the required adds, then break Vloxx’s defiance bar and prepare the south start for Final Form.
P4 Final Form
10–0% health
After the final intermission, we set up the P4 route:
- Start: just south of Vloxx, close to centre.
- Solve Greens: using the P2 formation so Melee can get some damage in before spears start falling.
- Movement: take a compact clockwise route through southwest to west, roughly 300–450 units from centre during the opening.
- First Excision Extremis: reach the West Excision position for the intended safe positioning.
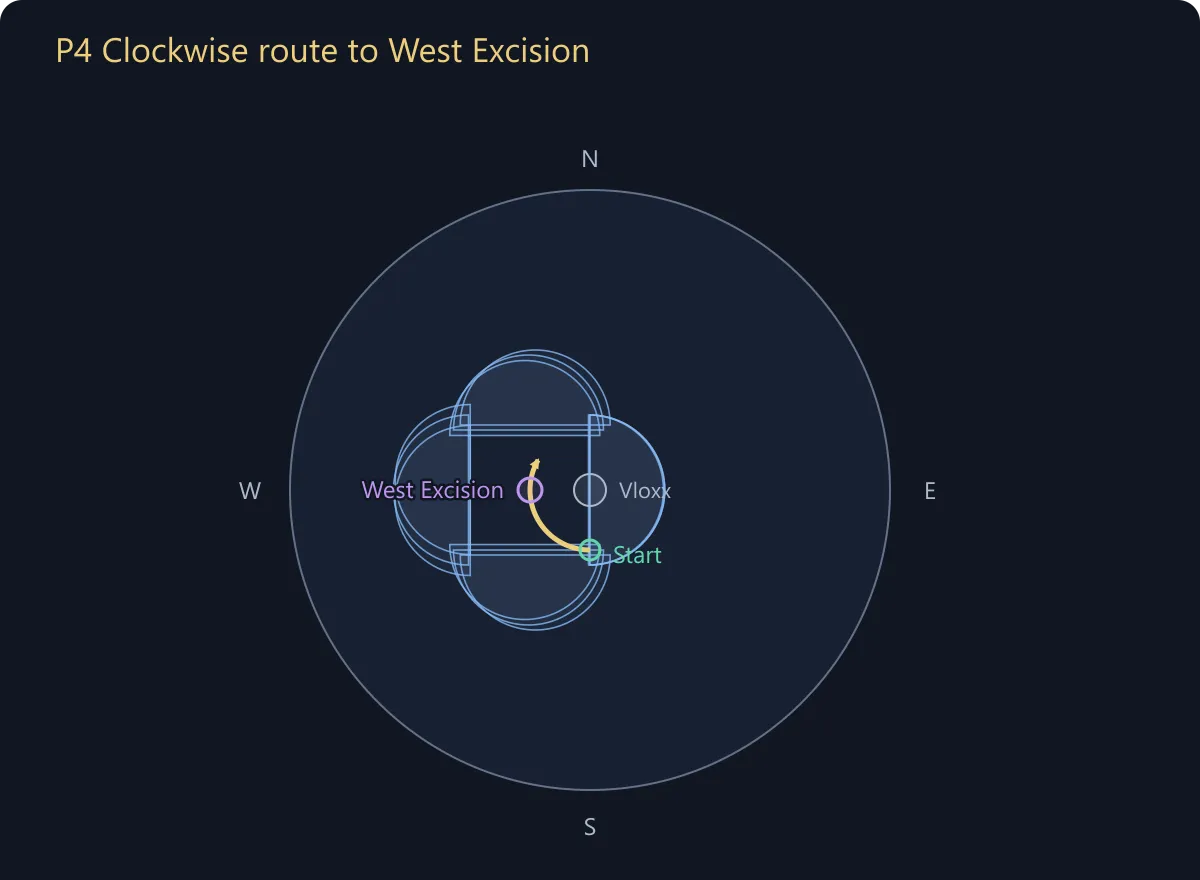
Clockwise movement to West Excision. Three tightly stacked targets produce three overlapping sets of four half-moons, leaving the stack between them.
First greens using the P2 formation
Greens are the first mechanic in P4, with warnings usually appearing about three seconds after the Final Form channel begins. We solve this first round like P2: melee at the front, healers with fixate back left, and ranged back right. Use the same group assignments and floater rules, with at least three valid soakers in each circle. Keep every soaker inside one green only.
Clockwise movement
Once greens resolve, we close back onto the group and continue clockwise from the south start toward the West Excision position. We watch each new spear warning and leave its circle as a group. The LCM spears are unblockable, so a visible projectile field does not make that position safe. At the West Excision position, we keep our facing and formation steady for the first Excision, then continue on the movement call.
We keep the movement compact: running ahead separates a green holder from their group, while falling behind leaves a player in the previous spear positions. Weapon Champions still attack independently, so we check their aim as well as the floor warnings.
Puddles and return route
The first puddle warnings usually begin about twenty-three seconds from the channel start. Puddles do not need to move far away or separate, they can take a slightly wider path around the clockwise movement and drop them together. Making sure not to fall behind.
Subsequent greens
For later greens, use the combined strategy’s Boneskinner formation. After resolution, regroup and resume clockwise movement. When puddles overlap with greens, preserve the movement and solve the greens, puddles will naturally drop behind the groups movement.
We repeat that movement and green cycle until the kill, keeping the formation intact as space becomes tighter.